
VM VirtualBox 6.1默认安装好后的Ubuntu再次启动后ip会自动更改,这是Ubuntu的默认联网方式,这种方式虽然省略了配置网卡的步骤,但是我们运维工程师常常通过SSH进行来链接对于动态的IP非常麻烦,所以我现在需要静态的IP 。
安装Ubuntu 19最新版本
Ubuntu Budgie 19.04操作系统今天作为Ubuntu 19.04 (Disco Dingo)发行版的一部分发布,增加了一些新特性、新外观和其他改进。
默认情况下,Ubuntu Budgie 19.04操作系统使用最新的budgie-applets附带最新的Budgie 10.5桌面环境,来自Cinnamon桌面环境的Nemo取代了Nautilus文件管理器,因为它保留了桌面图标功能并与Catfish搜索实用程序集成。
下面如何在VM VirtualBox6.1安装Ubuntu呢?
首先我们点击下载Ubuntu budgie 19,下载后的ISO文件放到到你的电脑磁盘分区里面的目录里。
接下来我们配置号VM VirtualBox,在这里我们以动画的形式进行配置配置后安装比较简单,这里就不在赘述,不懂的可以参考点击这里Ubuntu的安装。
配置静态IP地址
在以上安装和配置ok后,我们需要配置两块网卡,那么为什么呢?你可能有疑问,那跟着我跟你讲解为什么配置两块网卡,首先目的告诉你:
为了实现这个目的我们首先要明白virtualbox网络的模块的分类,我们可以通过下面的图进行讲解。
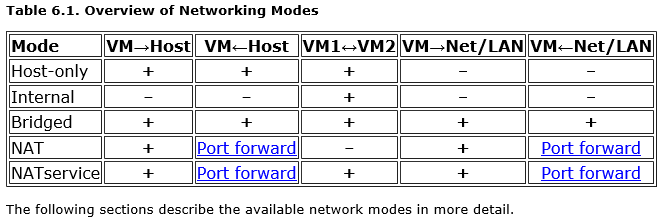
- Host-only networking:这个网络模块是可以用来创建一个包含主机和一组虚拟机的网络,而不需要主机的物理网络接口。相反,虚拟网络接口(类似于环回接口)在主机上创建,提供虚拟机和主机之间的连接。也就是虚拟机VM可以链接宿主机Host,链接宿主机Host也可以虚拟机VM,多个虚拟机VM也可以相互访问。
- Internal networking:这可以用来创建一种不同类型的基于软件的网络,它对选定的虚拟机可见,但对运行在主机上的应用程序或外部世界不可见。
- Bridged networking:这适用于更高级的网络需求,比如网络模拟和在客户端运行服务器。当启用时,Oracle VM VirtualBox直接连接到你安装的其中一张网络卡,并交换网络包,绕过你的主机操作系统的网络堆栈。
- NAT Network:NAT网络是一种允许出站连接的内部网络。
所以通过上图我们需要配置Host-only网卡和NAT网卡两个,接下来就让我们配置吧。在新安装ubuntu系统中,我们打开文件:
| 1 | sudo gedit /etc/netplan/01-network-manager-all.yaml |
把下面的内容写进去。
| 1 2 3 4 5 6 7 8 9 10 11 12 13 14 15 16 17 18 19 20 | # Let NetworkManager manage all devices on this system network: version: 2 renderer: NetworkManager ethernets: enp0s3: dhcp4: false #记住下面的这个IP是NAT的自定义的IP addresses: [10.0.2.12/24] #下面这个是网关IP,即使虚拟机->全局设定->网络NAT->属性(默认是网络CIDR是10.0.2.0/24,我们选中DHCP打勾,网关是10.0.2.1) gateway4: 10.0.2.1 nameservers: addresses: [8.8.8.8,114.114.114.114] enp0s8: dhcp4: false #在虚拟机->工具->主机网络管理器->选择Host-Only网络vmbox 6.1版本默认是有这个网卡的,选择查看下面的手动配置IPv4即使网关(gateway4所填写的ip地址),DHCP服务器取消勾选。addresses是自己随便定义的是为了在宿主机通过ssh链接使用的这个IP。 addresses: [192.168.56.22/24] gateway4: 192.168.56.1 nameservers: addresses: [8.8.8.8,114.114.114.114] |
注意:上面面内容是yaml的语法格式,缩进必须严格,否则会报错。
应用下面的配置内容。
| 1 | sudo netplan --debug apply |
| 1 | sudu ping www.sky8g.com |
最后重启虚拟机ubuntu即可,重启后可以通过下面命令查看配置的信息。
| 1 | ip a |
宿主机Windows 10通过SSH链接虚拟机Ubuntu Budgie
1.新安装的ubuntu 19的版本是没有ssh服务的,需要安装这个cetnos 8不一样,通过下面的命令进行查看。
| 1 | dpkg -l|grep ssh |

2.安装ssh服务
| 1 | apt install openssh-server |
| 1 2 3 4 5 6 7 8 9 10 11 12 13 14 15 16 17 18 19 20 21 22 23 24 25 26 27 28 29 30 31 32 33 34 35 36 37 38 39 40 41 42 43 44 45 46 47 48 49 50 51 52 53 54 55 56 57 58 59 | root@ubuntu-VirtualBox:/home/ubuntu/Desktop# apt install openssh-server Reading package lists... Done Building dependency tree Reading state information... Done The following additional packages will be installed: ncurses-term openssh-sftp-server ssh-import-id Suggested packages: molly-guard monkeysphere rssh The following NEW packages will be installed: ncurses-term openssh-server openssh-sftp-server ssh-import-id 0 upgraded, 4 newly installed, 0 to remove and 121 not upgraded. Need to get 670 kB of archives. After this operation, 6,001 kB of additional disk space will be used. Do you want to continue? [Y/n] y Get:1 http://cn.archive.ubuntu.com/ubuntu eoan/main amd64 ncurses-term all 6.1+20190803-1ubuntu1 [249 kB] Get:2 http://cn.archive.ubuntu.com/ubuntu eoan/main amd64 openssh-sftp-server amd64 1:8.0p1-6build1 [47.7 kB] Get:3 http://cn.archive.ubuntu.com/ubuntu eoan/main amd64 openssh-server amd64 1:8.0p1-6build1 [362 kB] Get:3 http://cn.archive.ubuntu.com/ubuntu eoan/main amd64 openssh-server amd64 1:8.0p1-6build1 [362 kB] Get:4 http://cn.archive.ubuntu.com/ubuntu eoan/main amd64 ssh-import-id all 5.7-24-g4001a38e-0ubuntu1 [11.5 kB] Fetched 340 kB in 1min 5s (5,265 B/s) Preconfiguring packages ... Selecting previously unselected package ncurses-term. (Reading database ... 232729 files and directories currently installed.) Preparing to unpack .../ncurses-term_6.1+20190803-1ubuntu1_all.deb ... Unpacking ncurses-term (6.1+20190803-1ubuntu1) ... Selecting previously unselected package openssh-sftp-server. Preparing to unpack .../openssh-sftp-server_1%3a8.0p1-6build1_amd64.deb ... Unpacking openssh-sftp-server (1:8.0p1-6build1) ... Selecting previously unselected package openssh-server. Preparing to unpack .../openssh-server_1%3a8.0p1-6build1_amd64.deb ... Unpacking openssh-server (1:8.0p1-6build1) ... Selecting previously unselected package ssh-import-id. Preparing to unpack .../ssh-import-id_5.7-24-g4001a38e-0ubuntu1_all.deb ... Unpacking ssh-import-id (5.7-24-g4001a38e-0ubuntu1) ... Setting up openssh-sftp-server (1:8.0p1-6build1) ... Setting up openssh-server (1:8.0p1-6build1) ... Creating config file /etc/ssh/sshd_config with new version Creating SSH2 RSA key; this may take some time ... 3072 SHA256:U8S7/MGfuqkbc1nTXXtrxoLKn484FNKBB4moQxctBZA root@ubuntu-VirtualBox (R SA) Creating SSH2 ECDSA key; this may take some time ... 256 SHA256:vm0E22ZJ/cIJuBD709Xf4xHlPVhX11A3z93pI6c+WVc root@ubuntu-VirtualBox (EC DSA) Creating SSH2 ED25519 key; this may take some time ... 256 SHA256:FkutBu6DtIPFLob5GIwvI02iM1uwP+uSgY4WGzT057g root@ubuntu-VirtualBox (ED 25519) Created symlink /etc/systemd/system/sshd.service → /lib/systemd/system/ssh.servic e. Created symlink /etc/systemd/system/multi-user.target.wants/ssh.service → /lib/sy stemd/system/ssh.service. rescue-ssh.target is a disabled or a static unit, not starting it. Setting up ssh-import-id (5.7-24-g4001a38e-0ubuntu1) ... Attempting to convert /etc/ssh/ssh_import_id Setting up ncurses-term (6.1+20190803-1ubuntu1) ... Processing triggers for systemd (242-7ubuntu3.6) ... Processing triggers for man-db (2.8.7-3) ... Processing triggers for ufw (0.36-1ubuntu3) ... root@ubuntu-VirtualBox:/home/ubuntu/Desktop# |

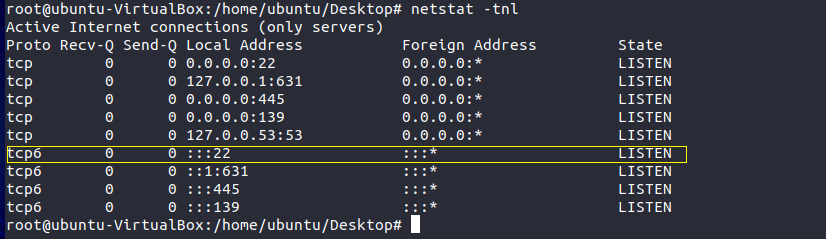
3.开启ssh的22端口
默认ubuntu是没有打开ssh的22端口,我们需要执行下面的命令。
| 1 2 3 4 | sudo apt-get install openssh-server sudo apt-get install ufw sudo ufw enable sudo ufw allow 22 |
4.通过putty或者xshell进行链接
| 1 2 3 4 5 6 7 8 9 10 11 12 13 14 15 16 17 18 19 20 21 22 23 24 25 | login as: sky8g sky8g@192.168.56.22's password: Welcome to Ubuntu 19.10 (GNU/Linux 5.3.0-51-generic x86_64) * Documentation: https://help.ubuntu.com * Management: https://landscape.canonical.com * Support: https://ubuntu.com/advantage * MicroK8s passes 9 million downloads. Thank you to all our contributors! https://microk8s.io/ 125 updates can be installed immediately. 21 of these updates are security updates. To see these additional updates run: apt list --upgradable The programs included with the Ubuntu system are free software; the exact distribution terms for each program are described in the individual files in /usr/share/doc/*/copyright. Ubuntu comes with ABSOLUTELY NO WARRANTY, to the extent permitted by applicable law. sky8g@ubuntu-VirtualBox:~$ |
链接成功ok。