大家都听说过最好的开源的电子商务平台Magento ,但是接下来我也将给大家介绍下使用比较多的x-cart电子商务系统,这个系统不差于Magento,那么什么是X-cart呢?
X-CART 5介绍
根据官网介绍:https://www.x-cart.com/
你的业务是不断变化的,你需要一个电子商务平台,是灵活的,可扩展的,负担得起。无论大小,我们的定制功能随着您的数字足迹的扩展而增长。
上面是他特性,比较灵活轻便等等。
X-CART和Magento比较
X-cart一个基于PHP的开源解决方案。作为一个授权的付费购物车。可以提供灵活的价格,所以它将适合任何规模和类型的业务。为超过25,000家在线商店提供动力。X-Cart在加拿大、越南、菲律宾、孟加拉国和其他10个国家处于领先地位。
Magento购物车-一个基于PHP和Zend框架的平台。它目前是电子商务世界的领导者。它为超过12.5万家商店提供支持,并被公认为世界上最灵活和可伸缩的解决方案。该平台有几个选项,包括免费和付费版本。Magento在大多数国家处于领先地位,包括美国、英国、德国、荷兰和其他129个国家。
X-CART系统要求
| 1 2 3 4 | PHP 7.2或更高版本 PHP扩展:pdo,phar,mysql,mbstring,curl MySQL 5.7.7或更高版本或等效的MariaDB Nginx的 |
首先查看下系统版本
| 1 2 | cat /etc/centos-release # CentOS Linux release 8.1.1911 (Core) |
安装最新的PHP版本
这里我们以Linux Centos为基础在Lnmp上安装x-cart 5,如果你的centos没有安装lnmp查看下面安装安装最新的LNMP。
1.首先我们安装 socat 、git命令等等
| 1 | sudo dnf -y install socat git |
2.安装PHP的yum创库文件
| 1 2 | sudo dnf install epel-release -y sudo dnf install https://rpms.remirepo.net/enterprise/remi-release-8.rpm -y |
3.查看php版本模块
| 1 | sudo dnf module list php |
4.开启使用最新版本的PHP 7.4目前是最新的版本
| 1 | sudo dnf module enable php:remi-7.4 |
5.安装和验证php
| 1 | sudo dnf install php php-cli php-common |
6.安装相关联的PHP模块
| 1 | dnf install php-fpm php-common php-mbstring php-xmlrpc php-soap php-gd php-xml php-intl php-mysql php-cli php-mcrypt php-ldap php-zip php-curl |
7.验证php版本
| 1 | php -v |
| 1 2 3 4 5 6 | [root@localhost ~]# php -v PHP 7.4.6 (cli) (built: May 12 2020 08:09:15) ( NTS ) Copyright (c) The PHP Group Zend Engine v3.4.0, Copyright (c) Zend Technologies with Zend OPcache v7.4.6, Copyright (c), by Zend Technologies [root@localhost ~]# |
安装最新的Nginx版本
1.首先我们查看下系统的版本以及架构
| 1 | /usr/libexec/platform-python -c 'import dnf, json; db = dnf.dnf.Base(); print(json.dumps(db.conf.substitutions, indent=2))' |
| 1 2 3 4 5 6 7 | [root@localhost ~]# /usr/libexec/platform-python -c 'import dnf, json; db = dnf.dnf.Base(); print(json.dumps(db.conf.substitutions, indent=2))' { "arch": "x86_64", "basearch": "x86_64", "releasever": "8" } [root@localhost ~]# |
2.安装dnf-utils工具包
| 1 | sudo dnf install dnf-utils |
3.创建yum库文件 /etc/yum.repos.d/nginx.repo 复制下面内容进行粘贴
| 1 | sudo vim /etc/yum.repos.d/nginx.repo |
| 1 2 3 4 5 6 7 8 9 10 11 12 13 14 | [nginx-stable] name=nginx stable repo baseurl=http://nginx.org/packages/centos/$releasever/$basearch/ gpgcheck=1 enabled=1 gpgkey=https://nginx.org/keys/nginx_signing.key module_hotfixes=true [nginx-mainline] name=nginx mainline repo baseurl=http://nginx.org/packages/mainline/centos/$releasever/$basearch/ gpgcheck=1 enabled=0 gpgkey=https://nginx.org/keys/nginx_signing.key module_hotfixes=true |
4.查看开启的仓库
| 1 | sudo dnf repolist all |
5.安装最新版本NGINX
根据官网有两个版本,一个是Mainline和Stable 版本。

| 1 | sudo yum-config-manager --enable nginx-mainline |
注意:这里安装的最新的版本,如果你想安装稳定的版本执行下面的命令
| 1 | sudo yum-config-manager --enable nginx-stable |
6.查看nginx的版本号
| 1 | sudo dnf info nginx |
| 1 2 3 4 5 6 7 8 9 10 11 12 13 14 15 16 17 18 19 20 | [root@localhost yum.repos.d]# dnf info nginx nginx stable repo 341 B/s | 15 kB 00:44 nginx mainline repo 15 kB/s | 38 kB 00:02 Available Packages Name : nginx Epoch : 1 Version : 1.19.0 Release : 1.el8.ngx Architecture : x86_64 Size : 811 k Source : nginx-1.19.0-1.el8.ngx.src.rpm Repository : nginx-mainline Summary : High performance web server URL : http://nginx.org/ License : 2-clause BSD-like license Description : nginx [engine x] is an HTTP and reverse proxy server, as well as : a mail proxy server. [root@localhost yum.repos.d]# |
7.安装nginx
| 1 | dnf install nginx |
8.设置开机启动和启动
| 1 2 | systemctl enable nginx systemctl start nginx |
9.开启防火墙http 80端口和https 443端口
| 1 2 3 | sudo firewall-cmd --permanent --zone=public --add-service=http --add-service=https sudo firewall-cmd --reload sudo firewall-cmd --list-services --zone=public |
10.检查ip地址
| 1 | ip a |
11.访问测试nginx
| 1 2 | curl -I http://192.168.56.12 curl http://192.168.56.12 |
测试如下
[root@localhost ~]# curl -I http://192.168.56.12
HTTP/1.1 200 OK
Server: nginx/1.19.0
Date: Sat, 30 May 2020 14:34:55 GMT
Content-Type: text/html
Content-Length: 612
Last-Modified: Tue, 26 May 2020 15:37:43 GMT
Connection: keep-alive
ETag: “5ecd37c7-264”
Accept-Ranges: bytes
[root@localhost ~]#
安装最新版本Mariadb
1.下载安装Mariadb库
| 1 | sudo wget https://downloads.mariadb.com/MariaDB/mariadb_repo_setup |
| 1 | sudo chmod +x mariadb_repo_setup |
| 1 | ./mariadb_repo_setup |
2.安装需要的工具
| 1 | sudo dnf install perl-DBI libaio libsepol lsof boost-program-options |
3.开启maridb库并安装Mariadb
| 1 | sudo dnf install --repo="mariadb-main" MariaDB-server |
安装完成如下
| 1 2 3 4 5 6 7 8 9 10 11 12 13 14 15 16 17 18 19 20 21 22 23 24 25 26 27 28 29 30 31 32 33 34 35 36 37 38 39 40 41 42 43 44 45 46 47 48 49 50 51 52 53 54 55 56 57 58 59 60 61 62 63 64 65 66 67 68 69 70 71 72 73 74 75 76 77 78 79 80 81 82 83 84 85 86 87 88 89 90 91 92 93 94 95 96 97 98 99 100 101 | [root@localhost wgitdownload]# dnf install --repo="mariadb-main" MariaDB-server Last metadata expiration check: 0:07:36 ago on Wed 27 May 2020 02:20:23 PM CST. Modular dependency problems: Problem 1: conflicting requests - nothing provides module(perl:5.26) needed by module perl-DBD-SQLite:1.58:8010020191114033549:073fa5fe-0.x86_64 Problem 2: conflicting requests - nothing provides module(perl:5.26) needed by module perl-DBI:1.641:8010020191113222731:16b3ab4d-0.x86_64 Dependencies resolved. ============================================================================================================================================================================================================ Package Architecture Version Repository Size ============================================================================================================================================================================================================ Installing: MariaDB-server x86_64 10.4.13-1.el8 mariadb-main 26 M Installing dependencies: MariaDB-client x86_64 10.4.13-1.el8 mariadb-main 12 M MariaDB-common x86_64 10.4.13-1.el8 mariadb-main 87 k MariaDB-shared x86_64 10.4.13-1.el8 mariadb-main 115 k galera-4 x86_64 26.4.4-1.rhel8.0.el8 mariadb-main 13 M Transaction Summary ============================================================================================================================================================================================================ Install 5 Packages Total download size: 51 M Installed size: 247 M Is this ok [y/N]: y Downloading Packages: (1/5): MariaDB-common-10.4.13-1.el8.x86_64.rpm 34 kB/s | 87 kB 00:02 (2/5): MariaDB-shared-10.4.13-1.el8.x86_64.rpm 78 kB/s | 115 kB 00:01 (3/5): MariaDB-client-10.4.13-1.el8.x86_64.rpm 1.1 MB/s | 12 MB 00:11 (4/5): MariaDB-server-10.4.13-1.el8.x86_64.rpm 1.7 MB/s | 26 MB 00:15 (5/5): galera-4-26.4.4-1.rhel8.0.el8.x86_64.rpm 1.0 MB/s | 13 MB 00:13 ------------------------------------------------------------------------------------------------------------------------------------------------------------------------------------------------------------ Total 2.9 MB/s | 51 MB 00:17 Running transaction check Transaction check succeeded. Running transaction test Transaction test succeeded. Running transaction Preparing : 1/1 Running scriptlet: MariaDB-shared-10.4.13-1.el8.x86_64 1/5 Installing : MariaDB-shared-10.4.13-1.el8.x86_64 1/5 Running scriptlet: MariaDB-shared-10.4.13-1.el8.x86_64 1/5 Running scriptlet: MariaDB-common-10.4.13-1.el8.x86_64 2/5 Installing : MariaDB-common-10.4.13-1.el8.x86_64 2/5 Running scriptlet: MariaDB-common-10.4.13-1.el8.x86_64 2/5 Running scriptlet: MariaDB-client-10.4.13-1.el8.x86_64 3/5 Installing : MariaDB-client-10.4.13-1.el8.x86_64 3/5 Running scriptlet: MariaDB-client-10.4.13-1.el8.x86_64 3/5 Running scriptlet: galera-4-26.4.4-1.rhel8.0.el8.x86_64 4/5 Installing : galera-4-26.4.4-1.rhel8.0.el8.x86_64 4/5 Running scriptlet: galera-4-26.4.4-1.rhel8.0.el8.x86_64 4/5 Running scriptlet: MariaDB-server-10.4.13-1.el8.x86_64 5/5 Installing : MariaDB-server-10.4.13-1.el8.x86_64 5/5 Running scriptlet: MariaDB-server-10.4.13-1.el8.x86_64 5/5 Two all-privilege accounts were created. One is root@localhost, it has no password, but you need to be system 'root' user to connect. Use, for example, sudo mysql The second is mysql@localhost, it has no password either, but you need to be the system 'mysql' user to connect. After connecting you can set the password, if you would need to be able to connect as any of these users with a password and without sudo See the MariaDB Knowledgebase at http://mariadb.com/kb or the MySQL manual for more instructions. Please report any problems at http://mariadb.org/jira The latest information about MariaDB is available at http://mariadb.org/. You can find additional information about the MySQL part at: http://dev.mysql.com Consider joining MariaDB's strong and vibrant community: https://mariadb.org/get-involved/ Verifying : MariaDB-client-10.4.13-1.el8.x86_64 1/5 Verifying : MariaDB-common-10.4.13-1.el8.x86_64 2/5 Verifying : MariaDB-server-10.4.13-1.el8.x86_64 3/5 Verifying : MariaDB-shared-10.4.13-1.el8.x86_64 4/5 Verifying : galera-4-26.4.4-1.rhel8.0.el8.x86_64 5/5 Installed: MariaDB-client-10.4.13-1.el8.x86_64 MariaDB-common-10.4.13-1.el8.x86_64 MariaDB-server-10.4.13-1.el8.x86_64 MariaDB-shared-10.4.13-1.el8.x86_64 galera-4-26.4.4-1.rhel8.0.el8.x86_64 Complete! [root@localhost wgitdownload]# |
4.开启数据库并设置开机启动
| 1 2 | sudo systemctl start mariadb.service sudo systemctl enable mariadb.service |
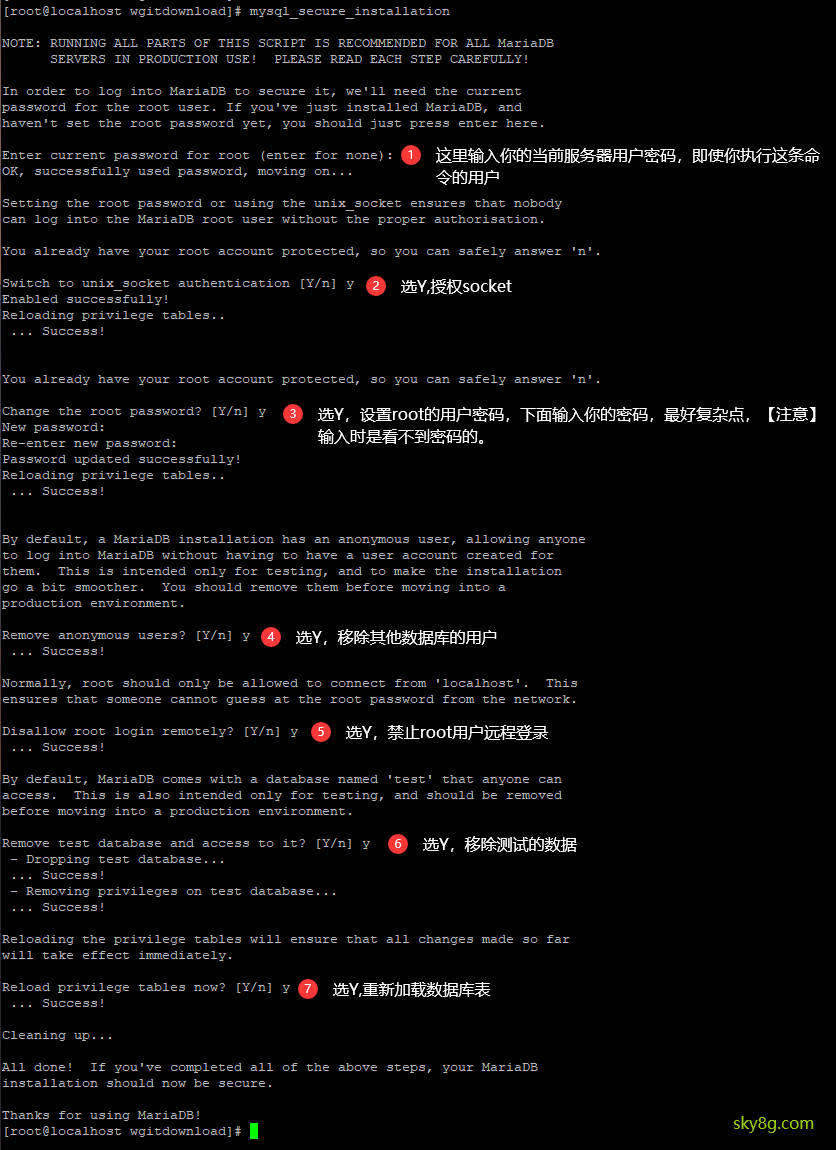
5.配置安全的MariaDB数据库
MariaDB Server 10.3和10.4将所有数据文件和表空间写到文件系统上一个名为data directory的目录中。安装包之后,运行mysql_install_db实用程序来提供这个目录。
| 1 | sudo mysql_install_db |
| 1 | sudo mysql_secure_installation |
如下图
安装X-CART 5
1.首先创建数据库
| 1 2 | #进入数据库 sudo mariadb -u root -p |
| 1 2 3 4 | CREATE DATABASE xcart; GRANT ALL ON xcart.* TO 'sky8g' IDENTIFIED BY 'sky8g.com'; FLUSH PRIVILEGES; exit; |
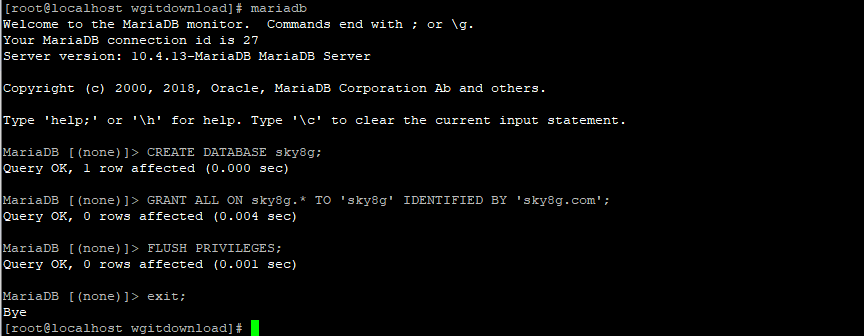
2.登录数据库进行验证
| 1 | mariadb -u sky8g -p |
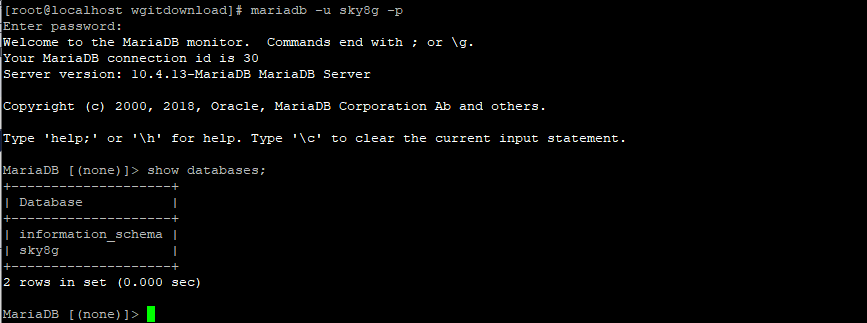
2. 修改配置 /etc/php-fpm.d/www.conf,注意NGINX的1.19版本的用户是apache用户,这里我们先不用更改。
| 1 2 | cd /etc/php-fpm.d/ cp -p www.conf www.conf.back |
3.设置文件的所属者
| 1 | chown -R apache:apache /var/www/html/xcart |
| 1 | mkdir -p /var/lib/php/session && sudo chown -R apache:apache /var/lib/php/session |
4.在官网从https://www.x-cart.com/download.html将最新版本的X-Cart下载到本地工作站,在通过sftp上传到服务器里面并且解压到/var/www/html/xcart/下面即可
| 1 2 | sudo tar -xzpf x-cart-5.4.0.10-en.tgz -C /var/www/html/xcart sudo rm x-cart-5.4.0.10-en.tgz |
5.设置权限
| 1 | cp /var/www/html/xcart/etc/config.defaulet.php /var/www/html/xcart/etc/config.php |
| 1 2 3 4 5 6 7 | cd /var/www/html/xcart sudo chown -R apache:apache var images files etc/config.php sudo find var images files -type f -exec chmod 0644 {} \; sudo find var images files -type d -exec chmod 0755 {} \; sudo chcon -t httpd_sys_content_t var images files -R sudo chcon -t httpd_sys_rw_content_t var images files -R sudo chmod 0666 /var/www/html/xcart/etc/config.php |
Centos 8默认是开启了selinux了,这是为了安全考虑,如果你关闭了这个功能,则可以忽略下面执行。
| 1 2 3 4 5 | sudo semanage fcontext -a -t httpd_sys_rw_content_t '/var/www/html/xcart/var(/.*)?' sudo semanage fcontext -a -t httpd_sys_rw_content_t '/var/www/html/xcart/images(/.*)?' sudo semanage fcontext -a -t httpd_sys_rw_content_t '/var/www/html/xcart/files(/.*)?' sudo semanage fcontext -a -t httpd_sys_rw_content_t '/var/www/html/xcart/etc/config.php' sudo restorecon -Rv '/var/www/html/xcart/' |
6.查看的开启的www.sock
| 1 | netstat -pl | grep www.sock |
[root@localhost ~]# netstat -pl | grep www.sock
unix 2 [ ACC ] STREAM LISTENING 60405 5730/php-fpm: maste /run/php-fpm/www.sock
[root@localhost ~]#
7.配置web站点服务器
| 1 | vim /etc/nginx/conf.d/xcart.conf |
把下面的内容复制到 xcart.conf文件里
| 1 2 3 4 5 6 7 8 9 10 11 12 13 14 15 16 17 18 19 20 21 22 23 24 25 26 27 28 29 | server { listen 80; listen [::]:80; root /var/www/html/xcart; index index.php index.html index.htm; server_name sky8g.com www.sky8g.com; location @handler { index cart.php; rewrite ^/sitemap.xml(\?.+)?$ /cart.php?target=sitemap; rewrite ^/(.*)$ /cart.php?url=$1 last; } location / { try_files $uri $uri/ @handler; } location ~ \.php$ { try_files $uri @handler; fastcgi_split_path_info ^(.+\.php)(/.+)$; fastcgi_index index.php; fastcgi_pass unix:/var/run/php/www.sock; include fastcgi_params; fastcgi_param PATH_INFO $fastcgi_path_info; fastcgi_param SCRIPT_FILENAME $document_root$fastcgi_script_name; } } |
8.重新加载配置nginx文件
| 1 | sudo nginx -t |
| 1 | sudo systemctl reload nginx |
| 1 2 3 4 5 | [root@localhost ~]# nginx -t nginx: the configuration file /etc/nginx/nginx.conf syntax is ok nginx: configuration file /etc/nginx/nginx.conf test is successful [root@localhost ~]# systemctl reload nginx [root@localhost ~]# |
9.利用前端向导安装即可
第一步安装向导x-cart 5.4
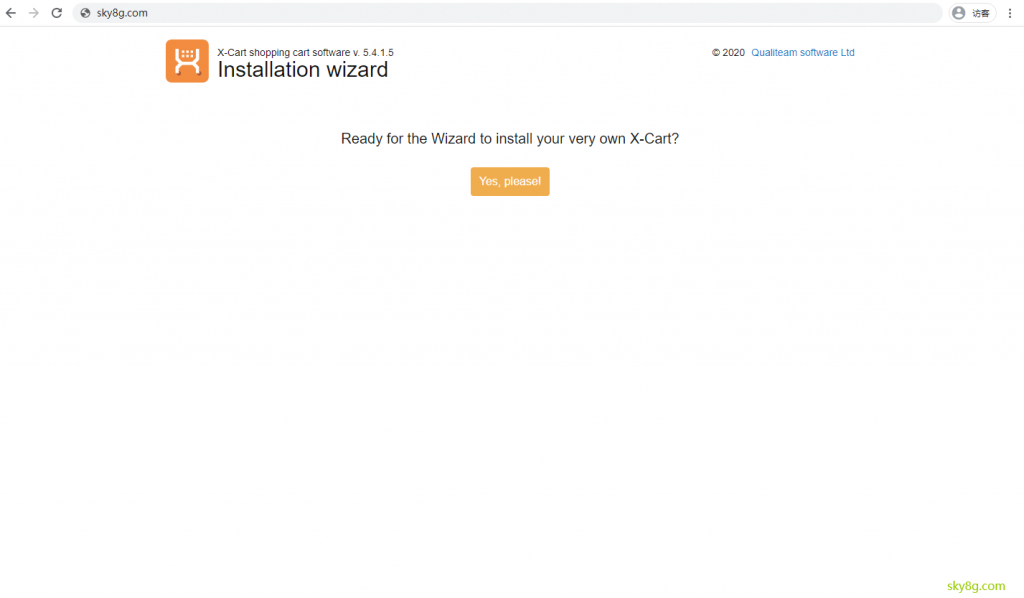
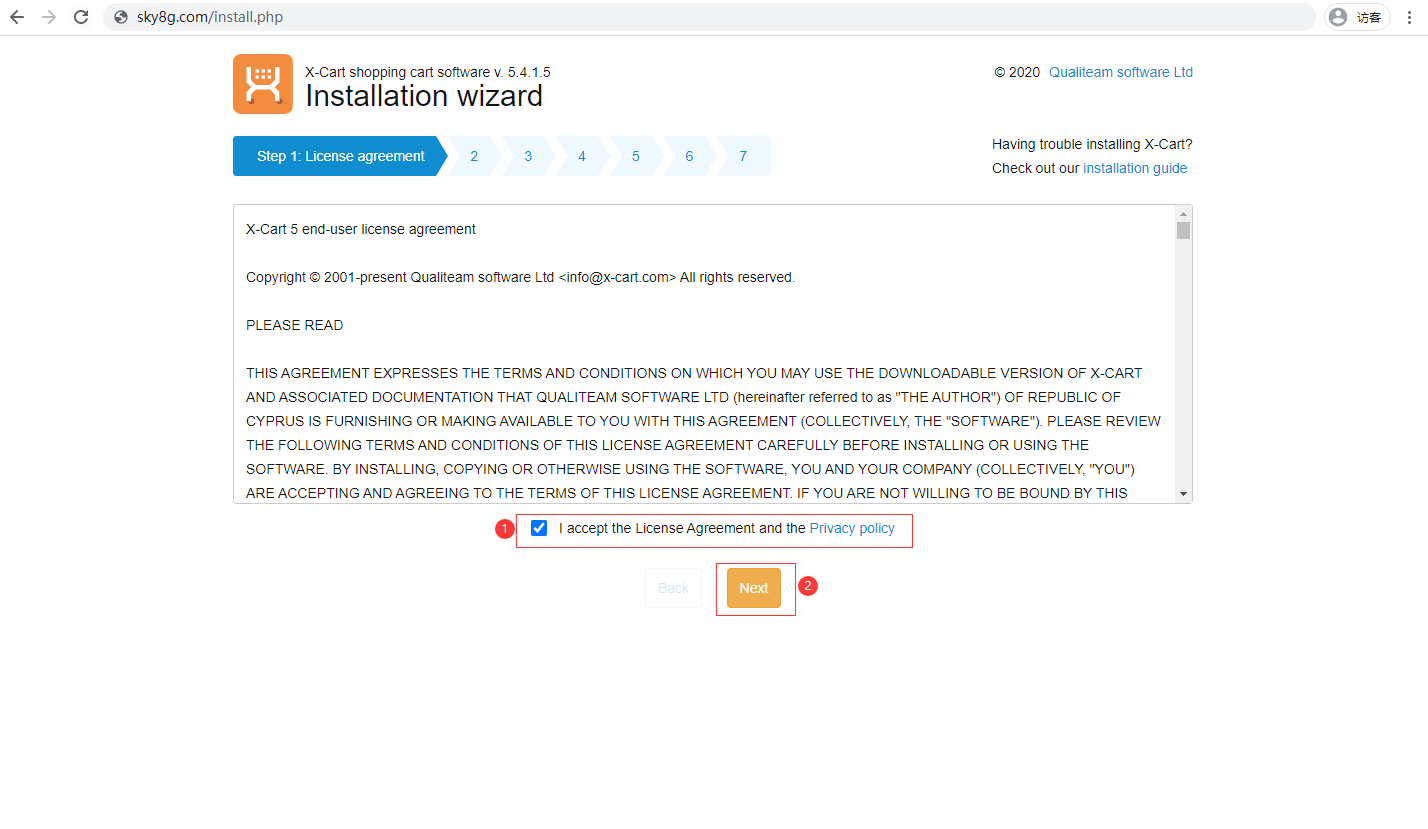
第二步,安装同意条款并点击下一步
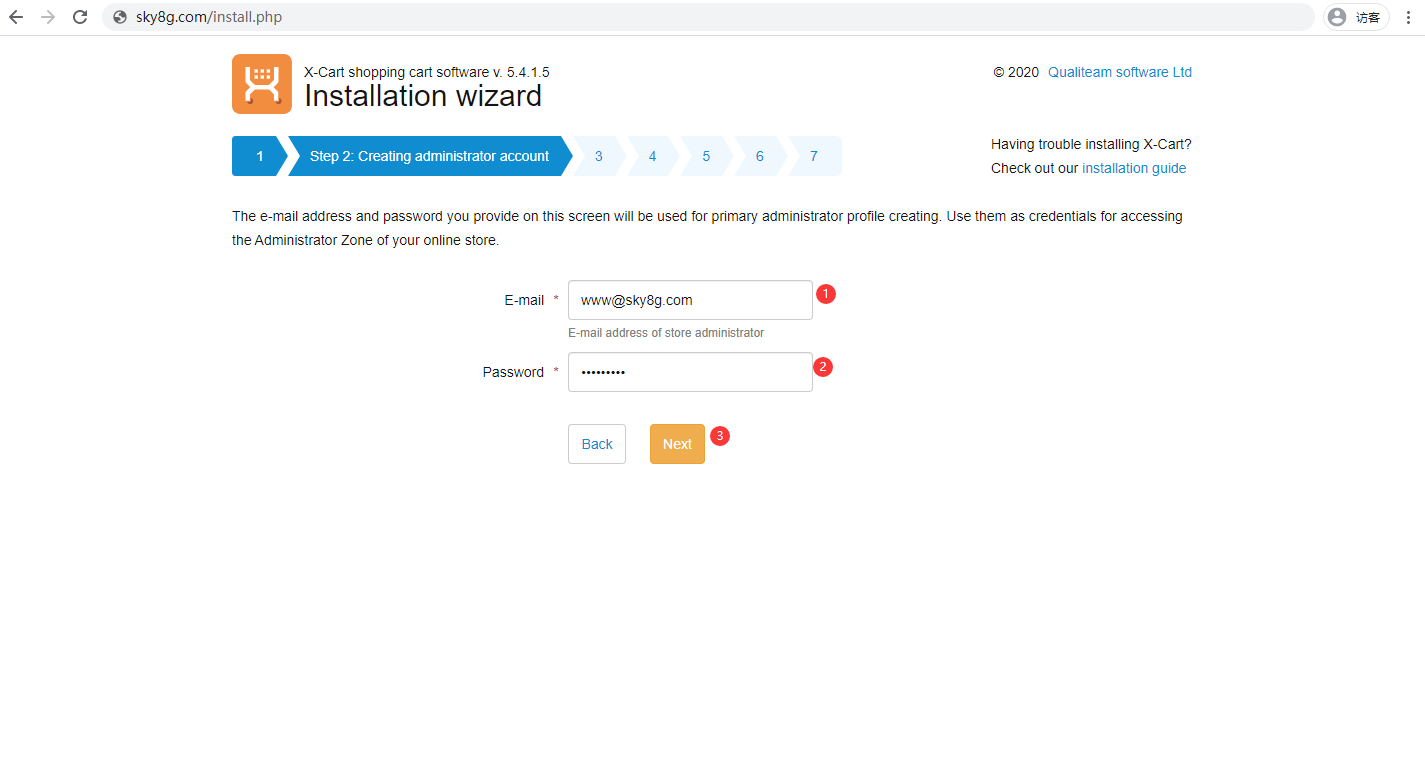
第三步,配置后台的登录用户和密码,点击下一步
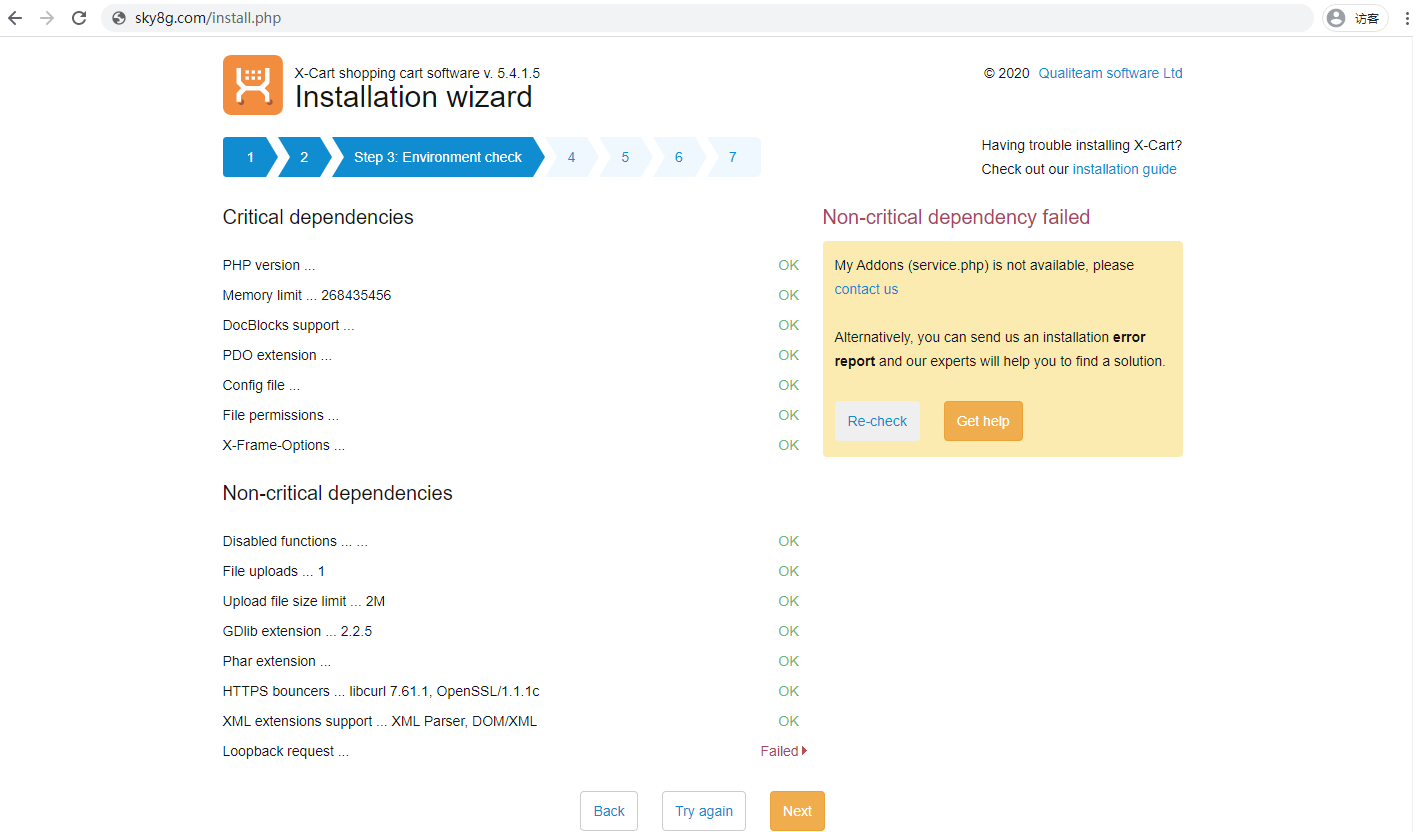
第四步,验证文件和目录权限以及服务器配置,点击下一步
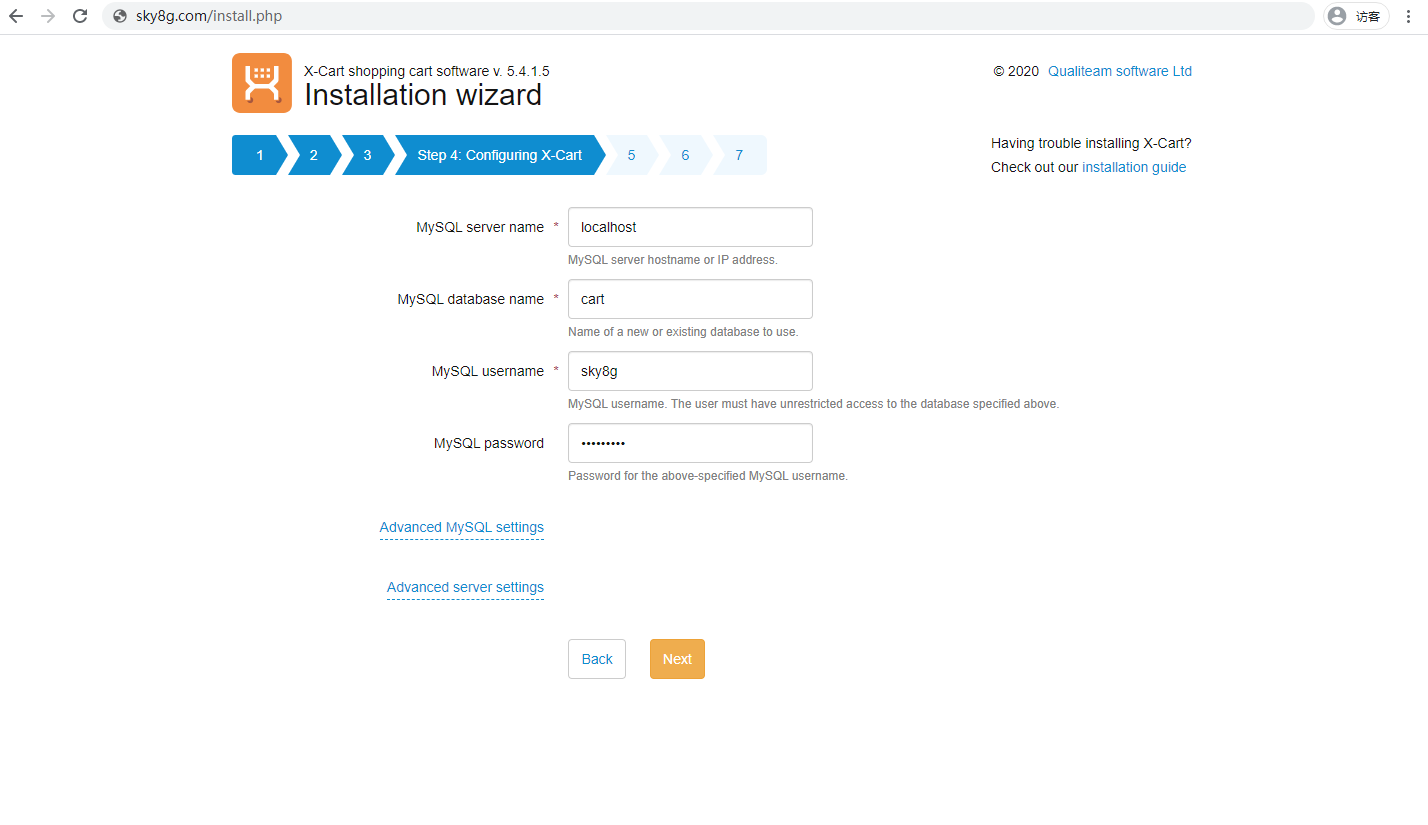
第五步,配置数据库,点击下一步
第六步,安装OK.
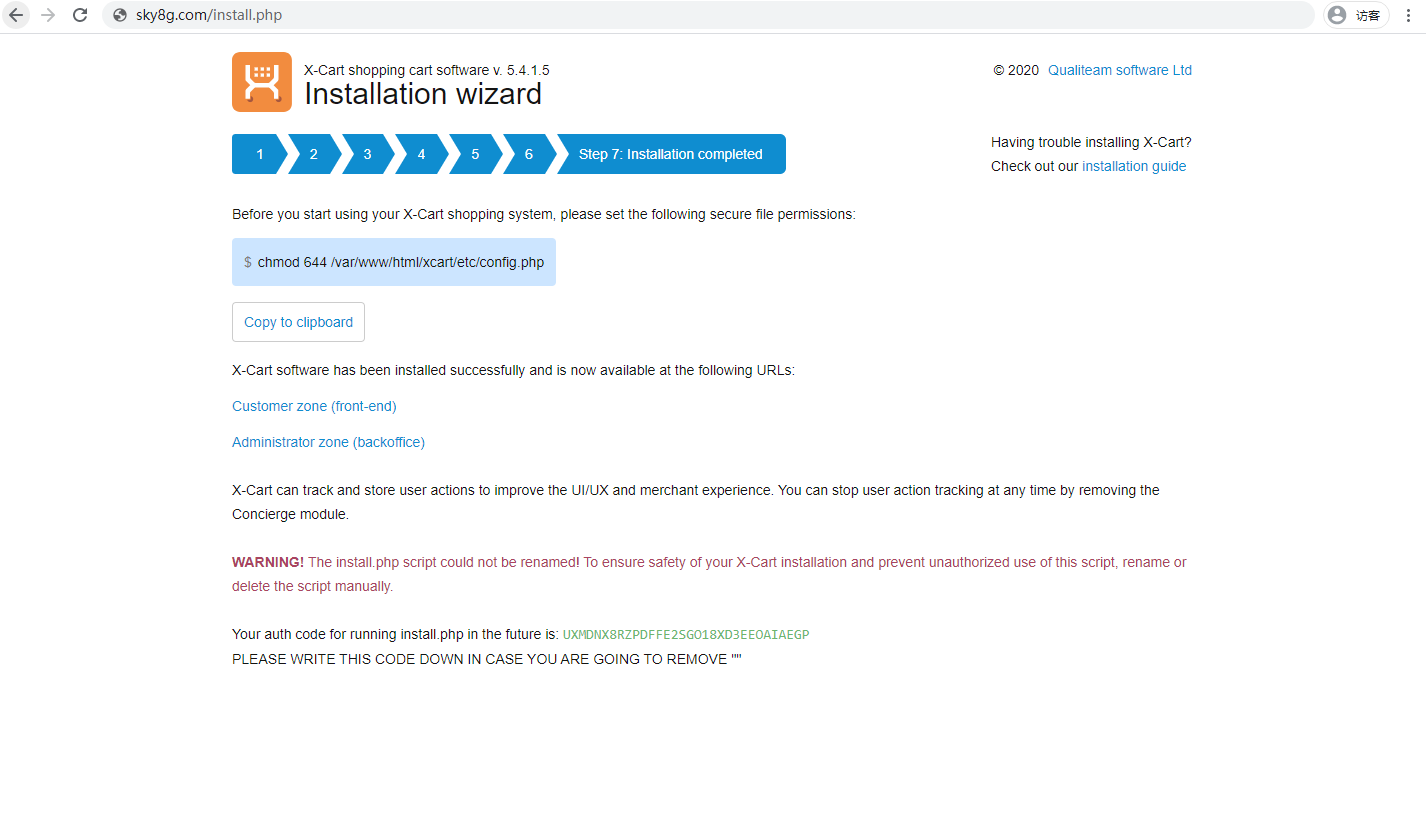
第七步,安装和访问前后台。
